Showing posts sorted by relevance for query recipe. Sort by date Show all posts

Monday, June 20, 2016

A quick dessert : Rose Cake

Some food are always intertwined with memories. Memories of the town where I grew up, my school friends, our families, our community. Like this one on Rose cake....

Years back, almost 20 years back one of my dear friend's Maa ( Kakima , as I call her) served this to us in an afternoon. It was bit sweet and a bit of crunchy. And I was intrigued by the beautiful floral shape! Kakima told the name as Rose cake. I was not into cooking at that point of life. Never asked for the recipe or any other details of the process. But somehow the memory of the rose cake etched a strong impression on my mind.


Years passed by. My friend Buntu and I went to different city to finish our education. Orkut or FaceBook had not made their presence in social circle, so sadly we didn't had email contact of each other. In 2007 I first visited United States and heard back Buntu's voice once again after ages! Again the spirit of our friendship started kindling up! 

 A friend is there to listen to my frustrations, my whimpering, my questions and all other trivial and non trivial things! Buntu and I have studied together in the same primary and high school. When I look back, memories of roaming around on our cycles, going to movie together and doing silly things flocks into my mind!

2015 Kakima was in USA after a long gap! And this time, I made no mistake, I had to put a meaningful end to my quest of Rose cake! So after long 20 years or so, a phone call , a WhatsApp session resulted recreating the same in my kitchen! More detailed inputs came from Kakima - the recipe is common among Keralites as Acchapam!

Below is the recipe from Kakima, I tweaked a little bit rice flour in it to add more crunchiness. It is a quick recipe. The preparation hardly takes any time, frying is the only time consuming part. I purchased the mould from Amazon. 


Before I type down the proportion, few words :

  • I fried the rose cake in a wok
  • Like any other deep frying stuff, the temperature of the oil needs to be sufficiently hot
  • Each time , the mold needs to immersed in hot oil for at least 1 to 1.5 mins before you put it to the batter. 
  • Slowly put the mould in the batter and then place it out it to hot oil. Shake it gently , the rosette will slowly leave the suface of the mould
  • Do not immerse the mold completely inside the batter, it might be difficult to shake off the rosette
  • As you keep frying, you might feel the batter has become thicker, please add some more milk to it
  • If you decide to change the mould shape in between fryings, proceed carefully, the mould will be very hot.
Recipe :
  • 3/4 th cup all purpose flour
  • 1/4 th cup semolina
  • 1/4th cup rice flour 
  • 1/2 cup ground sugar
  • 1 egg
  • 1 tea spoon baking powder
  • Few drops of vanilla essence
  • 1/2 cup milk or slightly more ( remember this should be more thicker than a standard pancake mix. We are trying to get the batter get adhered to the hot mould)
  • Oil for frying
Whisk all of the above ingredients to a thick smooth consistency. Heat oil in a wok. Put the mould and let it heat up sufficiently. Dip it in batter and put it back to the hot oil slowly. Shake gently when the rosette will slowly leave the mould.

This is sweet yet crunchy dessert. As a variation you might drizzle Maple syrup on the top it or eat it up just on its own!!


Serve these hot so that you can savor the crunchiness!
Bon appetit!

Wednesday, March 22, 2017

Ooey Gooey Baked Sondesh

Many people equate West Bengal as the land of ever abundant sweets. Every street corner has their own sweet shop which caters to local. While it is true that there is no dearth of varieties of sweets in Bengal, I personally think making sweets is a higher form of art, which am yet to master. The sweet makers are traditionally named as Modaks or Haluikars. I can recall images where I have seen those artisans kneading the soft cottage cheese for hours in big wooden plates.  Back in 90's people used to hire Haluikars  to make sweets for special celebration in the household - like marriage or rice ceremony. Right from making cottage cheese, transporting them to a facility, kneading and finally giving them shape, the art of making Bengali dessert is no easy-peasy game.


 However, most of my dessert making repertoire is limited to those varieties, which are no fuss and quick. One of them is Baked Sondesh, which, truth be told , is a one, which is a kind of cheat recipe, hence you will never find this in the authentic sweet shops of West Bengal. But, oh yes, this recipe serves my purpose!!

I made Baked Sondesh last week as a part of the Holi festival, why don't you give it a try?
Recipe for Baked Sondesh ( Makes about 15 Sondesh):

Ingredients:

Whole milk - 1 liter
Freshly squeezed lemon juice 4 tsp
Condensed milk - 3/4 th can
Milk powder - 1 cup
Almond nuts - 1/2 cup
Cardamom pods - 6
Mango pulp - 6-7 tsp ( optional)


Process :

  •  Boil milk in simmering heat in a heavy bottom pan. Once the milk starts boiling, add lemon juice. Keep stirring so that the juice gets evenly distributed. The milk will soon separate out to cottage cheese ( or chana)
  • Put off the flame and let the mixture rest for a while so that it is easy to handle.
  • Take a cheesecloth and strain the whole mixture. Also give it a quick rinse over clear water so that there is so no smell of lemon juice.
  • Squeeze out the excess water and let the mixture hang for couple of hours so that the extra water drips out.
  • Soak almond nuts in warm water and grind them to a smooth mixture ( use milk to facilitate grinding)
  • Now in a big pan assemble cottage cheese, almond paste. Add condensed milk. Mix everything thoroughly.
  • Use a porcelain/glass dish to bake ( drizzle oil on the baking dish and spread them evenly)
  • Take a water bath  ( Fill up a bigger dish with water and let the Baked Sondesh be in a smaller dish immersed in it)
  • Bake at 250 deg C for 40-45 mins, or until they turn slightly warm
  • Once you take out, the mixture will be still wobbly, let it cool down to room temp
  • Let it rest inside the fridge for 15-20 mins, so that it becomes firm, easier to handle
  • Garnish it with raisins, or poke a hole in the middle and fill up with Mango pulp!
Ooey Gooey Baked Sondesh is ready!

Friday, July 6, 2018

Fire on the plate - stuffed sweet pepper

Of all the vegetarian food I ever sampled in my life, I find Gujarati food to be quite exotic. During my Geological field trips, I stayed in Kutch for few weeks and I was taken by their warm hospitality. The influence of Jain culture predominantly makes the region to be vegetarian.

 Few years back I brought this cook book, Prashad Cookbook : Indian Vegetarian. Apart from showcasing traditional Gujrati recipes, the book follows the journey of Kaushy Patel and her family from India to UK. Kaushy currently resides in London and has a restaurant there.

The one recipe which I particularly enjoyed from this cookbook is : Renghan Reveya ( eggplant satay).

Earlier I had the notion that vegetarian food primarily deals with vegetables, but  Kaushy  has shown that there could be myriad of vegetarian variations by combining the staples ( like legumes and nuts) in right proportion!

Renghan means brinjal/egg plant in Gujarati. I have simplified the original recipe to suit to my needs. Instead of baby eggplants, I used sweet peppers. I have a feeling that this recipe can be also replicated with green plantains as well!


Ingredients:

  • Sweet  peppers - 12 pieces
  • Peanuts - 100 gms
  • Chickpea flour - 50 gms
  • Asafoetida - a pinch
  • Cilantro - 5-7 springs
  • Grated ginger - 1/2 tea spoon
  • Cumin seeds - 1/2 tea spoon
  • Tomato paste - 3 tea sppon
  • Plain yogurt  - 3 teaspoon ( hang it a a cheesecloth for half an hour to remove excess water)
  • Garam masala 
  • Turmeric powder
  • Rock salt  
  • Vegetable oil 


Process:

  • Clean the peppers and make a small incision ( I prefer to leave the stem on for decor purposes)
  • In the meanwhile make the stuffing for bell pepper.
  • Dry roast peanuts until they turn slightly brown. Remove them from fire and let it cool down. Husk them and grind to a fine powder.
  • Dry roast chickpea flour for 4-5 minutes ( once it reaches the optimum temperature, it should be aromatic). 
  • Mix the peanut powder, chick pea flour thoroughly. Add cumin seeds, chopped corriander, grated ginger, a pinch of asafoetida and rock salt. Add little oil and combine everything. Leave this mixture to settle well for half an hour.
  • Now put the stuffing inside the  pepper. Ensure that the pepper doesn't crack while you stuff them.
  • Lightly fry the bell peppers in a flat pan for about 15 mins ( ensure that all sides are equally cooked). I use minimum spray oil for frying
  • Making the gravy : Add oil in a pan. Once it is hot, add cumin seeds, asafoetida. Let it crackle for few seconds. Add a pinch of turmeric powder. In a separate bowl add tomato paste and yogurt. Add  half tea spoon of garam masala, salt to it and whisk it thoroughly. Before adding this paste to the pan, ensure the temperature is set to low.
  • Once you add this yogurt -tomato paste to pan, slowly increase the temperature. Now add the fried stuffed peppers and cover it with a lid. Let it rest for 10 minutes so that the peppers absorb the curry.
  • Serve hot with plain rice or roti!

I have always got rave reviews whenever I have presented this dish to my friends/family. In my opinion this dish looks good and tastes equally good. Why not try it?!!

Sunday, February 26, 2017

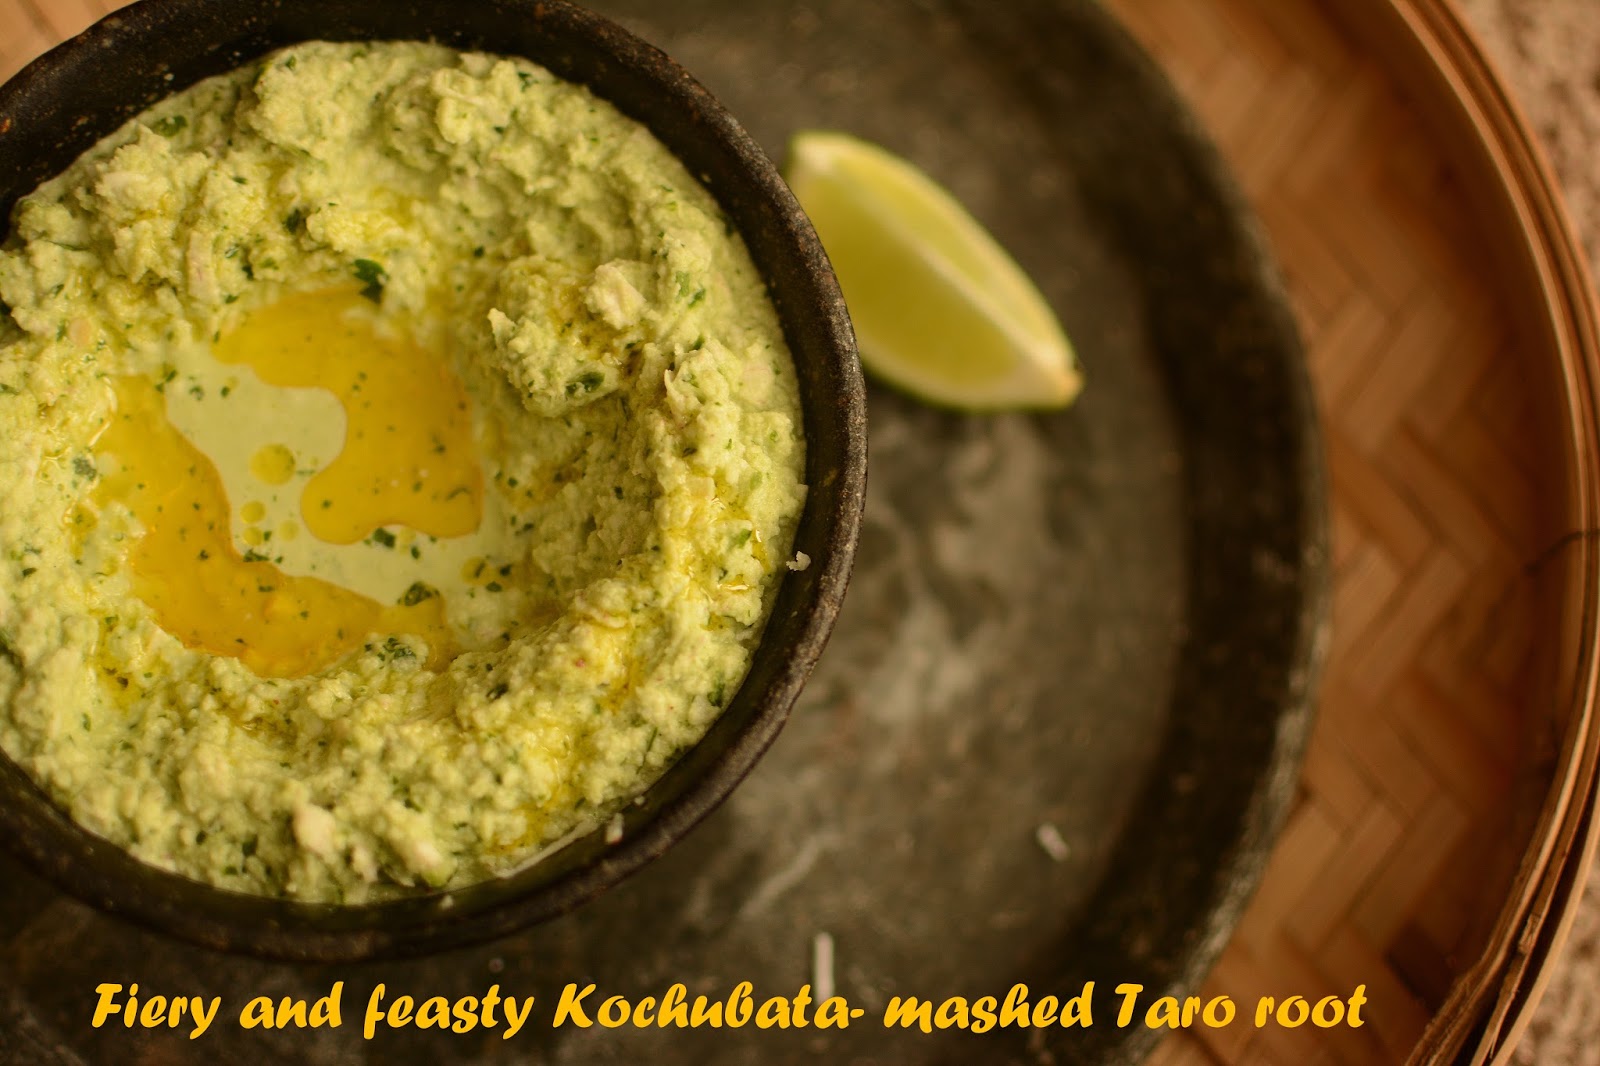
Fiery and feasty Kochubata - Mashed Taro root

Some of my favorite recipes are very earthy. Recipes which doesn't require any cooking, yet they are so savory. Like this one ~Kochu Bata or mashed Taro root.


The origin of this recipe is from Bangladesh. Many of the recipes of Bangladesh are unique as they use simple ingredients and Bangladeshis believe no part of a plant should be wasted, hence even this odd looking Taro root also graciously seats on dinner plate! Both of my parents are from Bangladesh, hence my cooking is also influenced by Bangladeshi recipes!

Kochu / Taro root is a humble vegetable. Our local Asian Grocery store sells it at 99cents/lb! For many people Kochu is a nuisance as the Oxalic Acid in Taro can cause itching in tongue and throat! But for me, Taro is always a delicacy! My Maa told me long back to add a dollop of Lemon juice to Taro root preparations to negate the effect of Oxalic Acid and I diligently follow her advice.


In West Bengal, Taro root and its associated are mostly found during the monsoon season. I remember many of the childhood lunches, where Maa would create this dish with utmost care and delighted with the prospect of eating Kochubata, those days I would take some extra rice!! Yes freshly steamed rice and Kochu Bata with a dollop of mustard oil seems heavenly to me! Taro root does not have very distinct flavor, but with the addition of freshly grated coconut, coriander leaves and green chilly, it gets an irresistible punch.

Few tips before I write down the recipe!

  • While peeling away the skin, make sure you remove all the "eyes" as visible on the flesh, as this helps to remove the pricking sensation in taste buds
  • Always add generous drops of lemon, it creates a zing as well helps to remove the Oxalates


Recipe for Kochu Bata or Mashed Taro root:

  • Taro root - 25 gm
  • Grated coconut - 1/2 cup
  • Springs of coriander - 2 or 3 sprigs
  • Green chillies -2
  • 1 tsp mustard oil
  • Lemon juice ( as per your taste)
  • Salt
Process
  • Wash the Taro root thoroughly and pat dry with kitchen towel 
  • Roughly chop the Taro root into 3-4 chunks
  • Remove the skin, take extra care to remove all traces of skin, including the eye
  • Grate them ( I used a hand grater)
  • Put them in a colander and run cold water water through it. Wash thoroughly to remove the white fluid. Let it rest for 15-20 mins
  • Meanwhile roughly chop the coriander leaves. Grind together coriander leaves, coconut and chilly ( be careful while adding water,  2 tsp of water should be fine) 
  • Now take the grated Taro root and grind it well ( might require few teaspoon of water to get a smooth blend)
  • In a separate bowl add the Taro paste and coriander-coconut paste. Add salt, freshly squeezed lemon juice and dollops of mustard oil!
  • Goes best with steamed rice!


Monday, October 17, 2016

Indian version of Momo!

It is not any surprising fact how food cuts across geographic boundaries. For instance,some of the culinary dishes  from Nepal has some similarities with food from China in terms of content, texture and how they are being cooked. Here I'm talking about Momo or dumplings. Momo is also common in some part of Northern India. When I googled about Momo, I came to this exhaustive  list.  Wow, there can be so many varieties of dumplings, I told to myself!! Right from sweet fillings to vegetables, Tofu and what not!

While growing up, I never had Momo. I first sampled Chinese dumplings at Bellaire Boulevard in Houston. One of my Chinese friend introduced me to this Chinese delicacy and I have enjoyed it henceforth. Bellaire Boulevard looks like Mini China. With all the signs interpreted in both Chinese and English, lots of Chinese grocery stores around the street, it is sometimes hard to believe that this place is tucked in Houston! Apart from sampling Chinese food, another good reason to visit Chinese market they have lot of vegetables which are also commonly eaten in India but cannot be find in Kroger or HEB or Walmart.
Bellaire Boulevard, Houston,  picture source: Wikipedia


Few months back, one of my friends from Nepal treated me with home made Momo. Be it Chinese dumpling or the Nepalese Momo, both had one thing in common - simple ingredients and a spicy dipping sauce. And my friend from Nepal also taught me the secret ingredient for Momo cover  - Gyoza Potsticker wrapper. It makes the whole process so easy!

I made Momo couple of times at home following her instruction. But I deviated. And I have to admit while the traditional Nepalese Momo or Chinese Dumpling doesn't require to precook ( or saute) the stuffing, I gave it an Indian twist by putting Masala and frying the vegetables lightly before they are being used as filler.

I also enjoy the simple yet delicious Chinese dumplings. . Stuffed with rice noodles, Tofu, Spinach and other things, I'm not an expert to suggest cooking variation of  Momo, but with my growing enthusiasm of trying quick and easy recipes, I thought this is appropriate to share the recipe here.

Recipe:

Momo wrapper : Gyoza potstickers ( available at most of the Supermarket. Thaw for half an hour before you are ready to put in the filling)

For stuffing ( Makes about 10-12 Momo)
1/2 cup shredded carrot
1/2 cup shredded cabbage
1/4 cup chopped beans
1/4 cup crumbled Tofu
1/2 tsp grated ginger
1/2 tsp grated garlic

I used a food processor for grating the veggies. One of the key steps here is the vegetables should be finely and evenly chopped.

Dry masala powder:
Roast together 1/2 tsp cumin seeds, 1/2 tsp coriander seed, 1 dried red chilly, 1/2 inch long cardamom stick. Grind it to a fine powder and keep aside.

Preparing the filling:
Heat oil in a pan. Once it is ready, put the shredded veggies and a little bit of salt. Keep stirring. Once the raw smell is gone, Put the dry masala powder and mix together everything. Don't overcook the stuffing, as later they will be steamed for 15-20 mins!


Preparing the Momo:

Thaw the Gyoza pot stickers. Once they are ready, they will easily pull apart from one another. Take a small bowl of water. Put a small scoop of stuffing at the center of the pot sticker. Lightly water around the edge.Now pull both the edges together to give the shape of a half moon and press it lightly so that the edges stick together.
I used a bamboo steamer to prepare Momo. In a big wok or pan, put enough water ( so that the steamer when placed inside it, the Momo receives steam but does not get in contact with water). Let it come to the boiling point. Place the Momos in basket leaving a little space between them. I had a two tier basket and after 10 minutes I changed the order of the basket so that all the Momos gets cooked evenly. Let it steam for good 15-20 minutes. When the Momos are done, the color will change from opaque to translucent.

Recipe for Momo chutney:


This is the best part of the dish.  While Momo is quite plain and simple, the chutney has a fiery kick in it! Chutney making doesn't consume much time and can be done simultaneously while the Momos are getting steamed.

Ingredients :

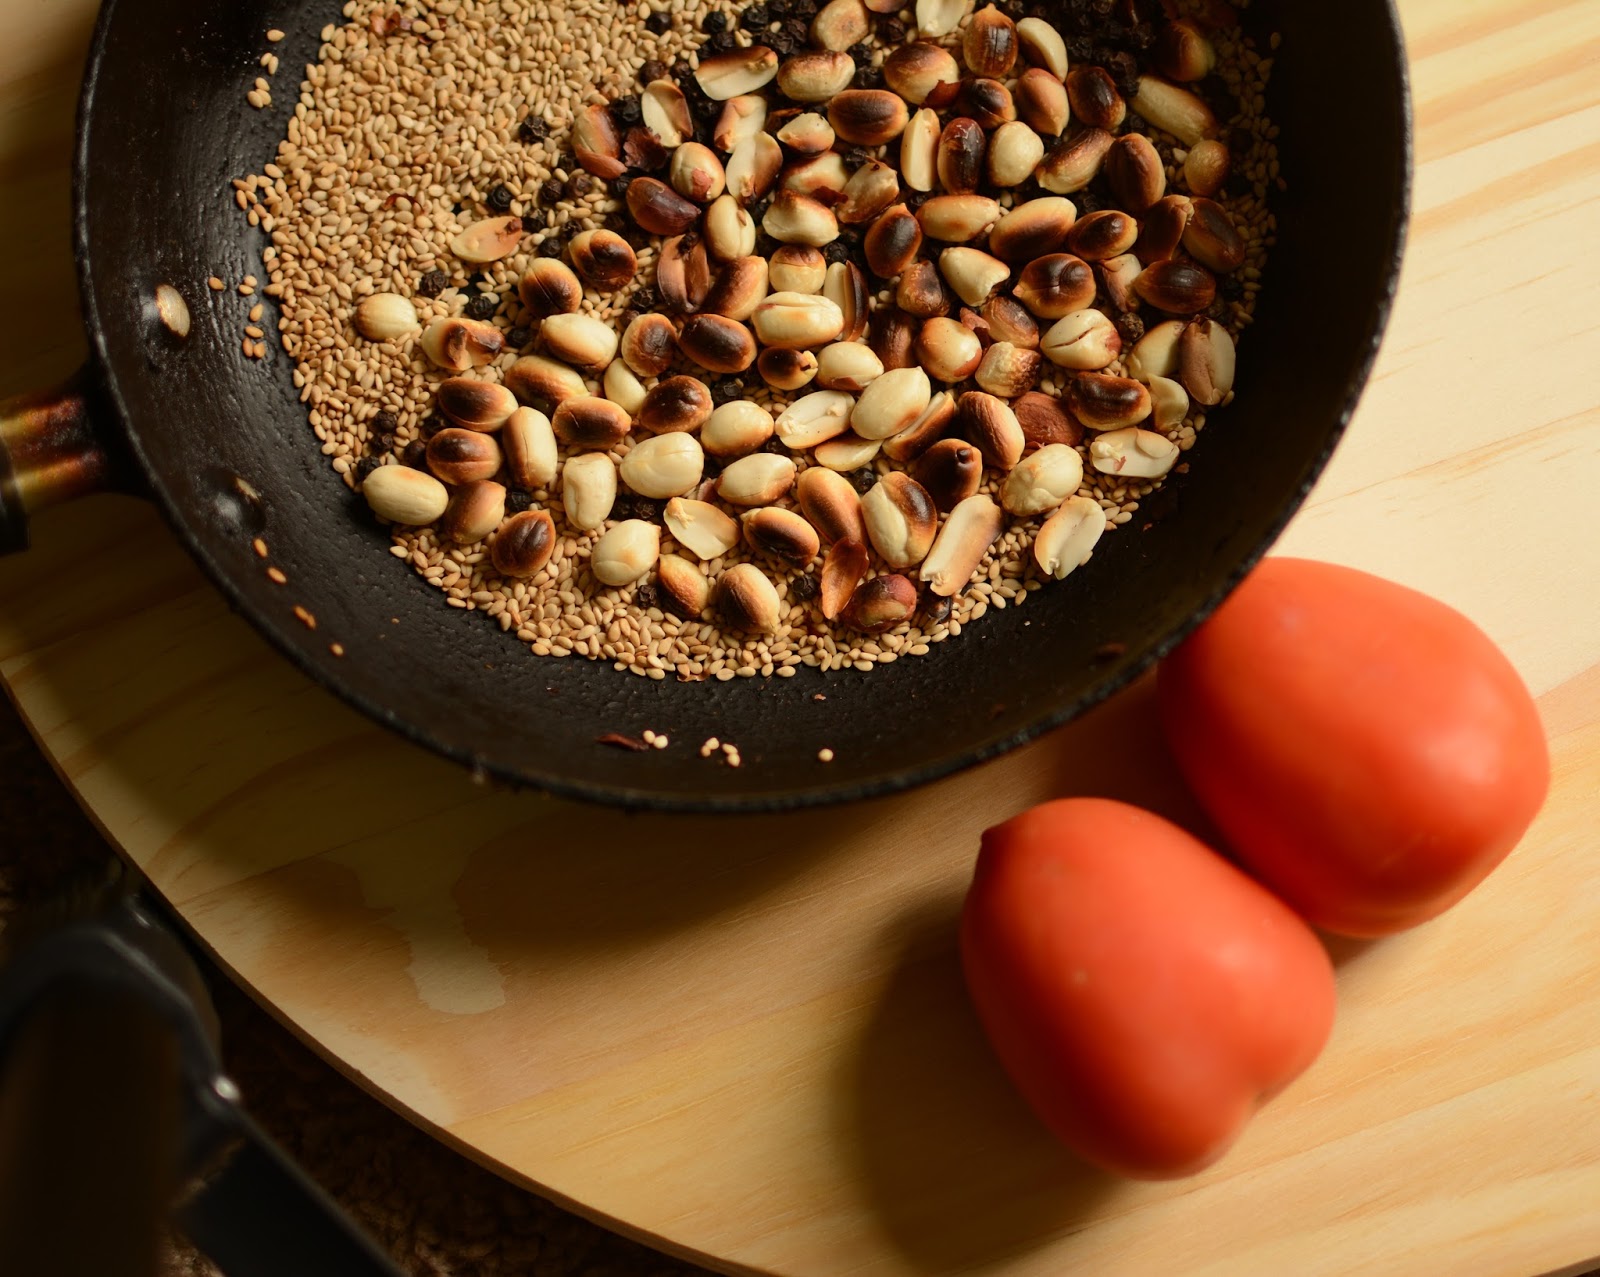
Half cup white sesame seeds
Two spoon black peppercorn
Handful of peanuts
Two ripe tomatoes

Method:

Dry roast the peanuts. Once they are done, during the last 20 seconds, add sesame seeds and peppercorn. I love the smell of this mixture! Remove from heat and let it cool and then roast to a fine powder. Now dry roast the tomatoes.Make few incisions and put in a pan without oil . Once it starts getting blackened, mash it with the back tip of the laddle. Let the water ooze out. It might take 8-10 minutes to get rid of the raw smell of tomato. Remove from heat. Let it cool down and puree it in a blender. Now mix together the roasted powder and the pureed tomatoes! The taste is tangy and fiery!


Serve hot Momos with Chutney and enjoy!


Thursday, July 21, 2016

Ready for a sip?

          Last few weekends have been quite busy for us. We had a great reunion of friends at Hershey,  followed by another visit to NOLA followed by Lil S's big birthday lunch followed by P's B''day when we drove to San Antonio! In the middle of all this I also started weekly volunteering to the local library.
But now we are back for good. No more weekend trips, at least for a month or so :-)

I was missing my blog. So today morning I thought of sharing an easy cocktail recipe! I made this for P's B'day and we both enjoyed it. Luckily this year P's B'day was on a Friday, so we could enjoy the evening to our heart's content.

 I had never used Triple Sec before, but I must say that I liked the taste. The staff at local Specs was very helpful to give me a hand in figuring out the right shelf!

Indulge this cool drink while you relax in your bath tub!
Water melon cocktail 

Recipe for Water Melon cocktail ( for two):

Water Melon juice - 1.5 cup
Vodka - 1/2 cup
Triple Sec- 1/4 th cup
A sprig of mint
4 tea spoon of lemon juice


  • De-seed Water Melon and blend it. Strain it and leave it refrigerated with the mint leaves and lemon juice for half an hour. ( I use the tender mint leaves at the tip of the stem)
  • Mix Vodka and Triple sec in a high ball glass and stir it
  • In tall flute glass serve Water Melon juice with the Vodka - Triple Sec
  • Your concoction is ready!
Get refreshed with this drink!


Thursday, June 22, 2017

Bread pakoda

Does sight of street food entice you? It definitely does to me! Heaps of Samosa, Aloo bonda, Mirchi Vada always brings a gush of happiness and hunger inside me. And after I am done with the eating part , I always wonder had I been a food seller, would I have been able to sell things without gulping them down? Who knows..may be at the end of the day I would have only fed myself instead of selling to the customers! Yes, such is my strong affection towards certain street food.

Different states of India have their own pet peeves when it comes to street food. And here I present one of my favorite street food from Maharashtra, the ubiquitous Bread Pakoda. The recipe can be deconstructed as sandwich dipped in a batter of chick pea flour and deep fried! Bread pakoda brings a zing in your taste bud when you take a bite at the fried green chillies! And the best part is, you can always team up Bread pakoda with a cup of hot Chaai and subdue the heat quotient from chilies!

Recipe for Bread Pakoda ( makes about 8 pieces):

  • Brown bread - 4 pieces ( white bread can be also used)
  • Boiled and mashed potato - 3 medium sized
  • Garlic coves - 3
  • A pinch of Asafoetida
  • Black mustard seeds - 1/4 th tea spoon
  • Cumin seeds - 1/4 th tea spoon
  • Salt
  • Chick pea flour - sieved - 1 cup
  • Baking powder - a pinch
  • Vegetable oil for frying
  • Green chillies - a handful


 Process :

Stuffing and sandwich:

  •  Make some holes in the potato by poking a fork and put them into hot boiling water ( with a pinch of salt).Boil the potatoes until till tender. Once they are done, don't let them sit in water for too long, otherwise they will become soggy and this might extend the cooking time.
  • Peel and mash the potatoes and ensure there are no lumps left. Check for salt and if needed, add some salt.
  • Put vegetable oil in a pan. Once it is hot add mustard seeds, cumin seeds and asafoetida. Stir them for few seconds. ( If the oil is sufficiently hot, the mustard seeds will splutter). Add minced garlic to the oil and stir for a minute or two so that the raw smell of garlic is gone.
  • Add the mashed potatoes to the spiced oil and mix everything together. Let it cook for 5-6 mins
  • Take 2 bread pieces and make a sandwich out of the mashed potatoes. Lightly grill them in a pan ( I add a heavy weight, like a kettle filled with water on the top of sandwich so that it becomes firm)
  • Cut the sandwich in halves ( alternately cut it into 4 small pieces for smaller size pakodas)

Preparing the batter and frying:
  • Sieve chick pea flour in a bowl to ensure there are no lumps
  • Add a pinch of salt and a pinch of baking powder
  • Slowly add water and keep stirring to get a smooth consistent mixture. Don;t make it too runny mixture, otherwise the chickpea flour coating will not adhere to the pakoda.
  • Heat oil in a pan. ( To check the oil temperature, put a little drop of batter to the oil, if the drop floats back immediately, the temperature is right for frying)
  • Take a sandwich, dip it in the mixture and fry it in the oil till they are slightly brown in all sides
  • For the mirchi fries ( chilly fries) take green chillies and poke them with a toothpick.Fry them in a pan with little oil. Sprinkle salt on the chillies before you serve them.
  • Serve Pakodas with green chillies on the side and a cup of tea!

Tuesday, April 19, 2016

The day that dawned differently

The phone was vibrating. It was past midnight. A flood alert has been issued.

Winds were howling outside and there were flashes of thunder.

It is a big day for Lil S and us as well. S was going to start his day care. I looked at him, sleeping peacefully in his crib next to us. P was in his night shift, he was supposed to get back home by 800 AM. I felt a little uneasy. Houston gets water logged very quickly, will he be able to make home safe, I thought and drifted back to sleep.


As the dawn broke, there were series of weather alerts in my phone. I called up the daycare, automated voice message told me due to inclement weather the day care is closed.
I felt like a little girl, who said "yay, rains"!

Outside the windows, trees were swaying with the downpour.There was watery silence everywhere - the steady drift of water on the bark of pine trees next to our balcony, the swimming pool brim almost overflowing. Raindrops seemed to have kissed the Kalanchoes and Jasmines.


P called back from work and asked if we are going to  have Khichuri for lunch!


The best thing about rainy day is to eat comfort food. Nothing quite compares the joy of having piping hot khichuri and spicy fries on a rainy day.
A Khichuri is a hearty meal made up of rice, lentils and veggies, served with a dollop of ghee (clarified butter).
Our lunch plates looked like this : Khichuri, dim bhaja (omelette), potol bhaja (pointed gourd fries), tomato chutney. I also made a drink of green mangoes!
I meant to share the recipe of green  mango juice or aam pana. Ideally a green mango is roasted in open fire. Pulp is extracted, mixed with spices to create the drink. But I don't have a ready access to open fire, I had to resort to simple boiling .

Recipe for aam pana /green mango drink  ( serves 2)

1 green mango
1/2 teaspoon of grated ginger
Roasted spices :2 teaspoon  (1 teaspoon cumin, 1 teaspoon coriander and 1 dried red chilly slightly roasted, crushed to powder)
Rock salt : as you need
Sugar as you need
Water to boil

Method:

  • Wash the mango and chop it into big chunks
  • Bring water to boil. Add the grated ginger. Add a pinch of rock salt and sugar
  • Add the mango pieces, cover it and let it boil until the pulp becomes tender
  • Once it is soft, turn off heat and let it cool completely
  • Scoop out the mango pulp. Add the roasted spices, rock salt and sugar. Your concentrate is ready.


For serving : take generous scoop of the mixed pulp and add to cold water. Add more rock salt and sugar and enjoy!


Friday, May 6, 2016

Saturday morning

Saturday mornings are like new promises unfolding slowly.

I can hold the cup of tea a bit longer. Can have a long gaze at my balcony garden and carry on a silent conversation with my greeny winnies.

Saturday mornings are a happy start. The kitchen seems a lot slower on Saturday and it should be!

I had not baked anything for a long time. A kind of inertia effect you may say! I was feeling a bit nervous about the proportions. But still the thought of a room filled up the smell of Carrot cake was a strong motivation to start the process of baking a cake.

While I sometimes hesitate on baking, on the other hand ,  my Maa has strong interest in baking. She bakes good cake and Nankhattai ( semolina cookies). Her cakes are simple, yet tad more delicious from the ones baked from stores. Back in 1980's when she started baking, microwave ovens had not make an appearance in the market. Maa had a simple electrical cake oven. It was probably Murphy brand. Sometimes the coil used to wear out and we had to get it fixed.
It didn't had any temperature control, but still the baked cakes were yummy.

Her ingredients were also simple - Vanilla essence and dried fruits. I have memories of helping her during the baking process. Sometimes she would ask me to whip the eggs or sometimes I would cut the butter paper in circles which would be used as a liner in the baking tray.

I looked into few Carrot cake recipes from the web and did little changes. The end results were very gratifying!
There is nothing better to me than sitting on the balcony with a huge coffee mug and savor a slice of Carrot cake!

Recipe for Carrot cake :

All purpose flour : 2 cups ( sieved)
Oil : 1.5 cups
Eggs: 4
Baking powder: 2 tea spoon
Cinnamon powder : 2 tea spoon
Ground Sugar : 2 cups
Salt : 1 tea spoon
Grated Carrot : 1.5 cups
Grated Coconut: Half cup
Sliced almonds : Half cup


Sieve the flour. Whisk the eggs thoroughly. Now mix together the flour, sugar, oil, eggs, salt and baking powder. You may do it manually or use the electrical cake beater.  Fold in the grated Carrot, Coconut, Almonds, Cinnamon powder as well.

In the meanwhile grease the pan, and dust it with flour lightly. I used a 9 by 13 inch pan. Preheat the oven at 325 degree C.
Once it is ready pour the batter and let it bake at 350 degree C. I baked for 35 mins and had to use another 15 mins of standing time.
It is not that difficult. Once you have the ingredients in your pantry, it is really easy!
Lil S trying to get his share as I try to capture an image

Saturday, January 17, 2026

The Hands That Create - Frames From Everyday Walk of Life


Life flows on, often in a great gusto. Here is my attempt to capture the frames from everyday life, as I see them unfolding. Ordinary people, ordinary practices, something to think about and perhaps smile...

This montage is for people from various walks of life.

A for Autorickshaw!! The ubiquitous life line of Mumbai! The standard black-yellow built and the drivers in Khaki! Circa Dec 2018


C for Chop!!!! Badal da .. the chop seller at Uttarpara. Chop in Bangla means fried fritters. As a child, I always used to wonder at how do these chop sellers keep running their business running? Do they ever feel to sneak out and gulp couple of their own creations?? Badal has lots of recipe in his repertoire. P claims that Badal has neither lost nor gained weight over the years!


D is for Dhaaki!!  The ones clad in Dhoti and carry the BIGG Dhaak for the autumnal festivities! Some of them carry a festive feathery outfit, which is a sight to see! Circa: Oct 2021


D for Dhunuri!! Dhunuri are the people who carries a big sword like fixture. People would ask them to fluff up the cottons from pillows and duvets. I somehow feel this trade is going down. I do remember the sound which comes from these Dhunuri- it is a very typical plucking sound. Dec, 2025


F for Flags!! Girl selling Indian flags, pre Republic Day, Vashi, Jan 2023


K for Key Maker!!! Key maker lane, near Shivaji Chowk, Vashi. There is a lane in Vashi which is entirely dedicated to make duplicate keys and locks! I have now lived on and off in Mumbai for the last 25 years. And like me, if you talk to any other Mumbaikar, the chances are they will tell you the story that they got locked out from their apartment at some point of their lives. They will also tell you, that they were not properly dressed at that time. But somehow they had to borrow clothes and money and get the business sorted out!! I have faced this situation TWICE in my 25 years, the first one I own it, second was NOT by me!!! Jan 2023

K for Key Making Key-making machine, Vashi


R for Rice!!! Women harvesting rice,  near Kamshet, Pune. A very common picture in rural Maharashtra. This picture sings song of Western Ghat, rains, lush greenery, simplicity, community, hard work and what not!! Aug 2007


S for Sabzi Mandi!!!My long lost "Taai"s. In a world which is increasingly getting dominated by Blinkit, Zomato, Swiggy, there is a different kind of charm which rests in a Sabzi Mandi. The world which looks more greener, neatly stacked veggies and herbed. Loved this moment from my recent trip. Jan 2025


U is for Uber!! Sometimes the app doesn't work seamlessly across international locations. Booking a cab/pick-up location has significantly changed for all airports across the world. For Mumbai International, one has to walk to P7 to catch a ride. I chugged my luggage to P7 - but the app gave up on me :( The eternal wheel kept rotating and I became anxious, what if if I cannot book a cab? Do I need to get out of this area, walk up to the side walk and catch a ride? Then I saw this girl. She is perhaps an Uber employee who lent her phone to me and I booked (on cash). Simple joy! 


Thursday, March 9, 2017

Aloo chaat from Nepal

Do you recognize that sometimes our taste bud gets influenced by our friend circle? It is true that our friends modify our culinary journey in a meaningful way, like my friend B, from Nepal. Until I met B, my knowledge about Nepali cuisine was limited to Momo and Thukpas, but now I have been enlightened a bit more. Few week's back B made this chaat on the eve of her daughter's Annaprashan and I was instantly smitten by this chaat ( or Aloo Achaar as they say in Nepalese cuisine)!
But hang on, Chaat and Achaar are not the same variety as per North Indian vocabulary. While Chaat can be loosely translated as tangy salad, Achaar on the other hand means pickle. Am not going to the debate of whether this dish should be called as Chaat or Achaar, but the truth be told, this is quite a "pick me up dish "according to me!

What intrigues me in the Nepali cuisine is their generous use of Seasame seeds. Roasted Seasame flavors delicious and I could never imagine that Seasame seed paste will go well with Aloo-Kakri chaat ( a salad of potato-cucumber). You might say there is nothing novel about a potato-cucumber chaat, but wait till you taste this dish and decide for yourself!


Apart from the nutty flavor, this dish boasts the goodness of green Moong sprouts, Pea sprouts! One might also add  crunchy carrots to further elevate the goodness!!


Without further ado here is the recipe :

Ingredients: ( serves 3-4 )

  • Medium size potatoes 2 ( boiled and cubed, take care to ensure that the potatoes doesn't become mushy)
  • 1 cucumber - cubed
  • 1/4 cup Moong sprouts
  • 1/4 cup Pea sprouts ( see notes on sprouts)
  • 1/4 cup chopped onion
  • One lemon
  • 1/4 cup roasted Seasame seeds
  • Chillies - 2 ( finely chopped)
  • Rock salt
  • 1 tsp vegetable oil
  • A pinch of fenugreek seeds


Process :

  • Take a big bowl and combine all the veggies.
  • Add lemon juice and rock salt and mix up everything
  • Roast Seasame seed until they are lightly golden. Grind it to a fine powder and add it to the veggies
  • Heat oil in a pan. Once it is ready, add Fenugreek seeds and lightly roast it. ( Don''t let it get heated too long, otherwise it will turn too bitter). Add this Fenugreek laced oil on the top of Chaat and mix everything together.

Serve at room temperature!

Notes :

Sprout forming is more easier when the temperature is around 70 F or mid 20 C. Soak a handful of Moong beans or Peas in water. Let it rest overnight. Once the Beans have swollen, take them away from water, wash well and let it rest again for another night. The Beans will germinate and sprout out.

Friday, August 5, 2016

Lentil-Quinoa salad

I have been always fond of Lentils. Lentil soup, as we say it in our language, Daal, is an integral part of my diet. But I was never exposed to the idea of Lentil salad until I first tested Mediterranean cuisine! I have been to Egypt couple of times and among the various things I enjoyed over there, Egyptian food was simply heart warming! Simple, yet it has tasteful combination of spices and vegetables.

Couple of weeks back P and I were talking about healthy dinner options and the idea of making a Lentil-Quinoa salad struck me. Till date Quinoa is not so common in India. And that shouldn't be a surprise because historically Quinoa was first domesticated in South America. I was reading about the history of Quinoa and found out that the Incas had a high regard for Quinoa. Traditionally, each year the king used to plant the first tree! This seed has an impressive journey for the last 500 years! With the Spanish invasion in South America, Quinoa was replaced with cereals and cultivation of Quinoa was suppressed. From 1970 onwards Quinoa cultivation again gained momentum.More on this can be found here

So finally I made this Lentil Quinoa salad and tried to infuse both Mediterranean and South American style. For the last two weeks we are eating this salad for our dinner. Assembling the different ingredients might take some time, but at the end we were happy souls! There could be lot variations for this salad, the more the merrier!

Recipe for Lentil -Quinoa salad ( serves two)

Ingredients :
Unhusked red Lentils -1 cup
Chick peas- 1/2 cup
Quinoa - 1 cup

Embellishment/toppings
Tofu - 25g ( for marinade : Tomato Ketchup - 2tsp, Soya Sauce- 1tsp, garlic paste-1/2 tsp and bread crumbs)
Boiled eggs - 2
Avocado -1
Asparagus
Carrot peels -
Chopped onion
Chopped cucumber
Chopped tomatoes
Roasted nuts
Dried cranberry
Lemon juice
Parsley sprigs

Spices :
Rocksalt
Roasted cumin powder : 1 tbsp
A pinch of Oregano
A pinch of Rosemary
Roasted seasame seeds
Chilly flakes


Method :
Soak red lentils and chick peas for 6 hours. Wash them thoroughly and boil them in salted water for about 20 mins. They should be soft. Boil Quinoa in a separate pan ( see the packet for instructions, I had to boil them for about 10 mins). Mix together the lentils, Quinoa in a big bowl , add lemon juice and cumin powder. Check salt and leave it refrigerated.

In the meanwhile prepare a marinade for Tofu. In a bowl mix together tomato ketchup, Soya sauce and garlic paste. Cut the Tofu in small cube and marinade them for half an hour. Coat the marinated Tofu with bread crumb and fry them.

The embellishments make the salad interesting. I did add boiled eggs, sliced Avocados, grilled Asparagus, roasted peanuts, handful of cranberries and chopped carrot, onion, cucumber. But you may add according to your liking and make it even more interesting.

The last part is assembling. Add your favorite toppings with the Lentil Quinoa salad. Add the spices. We like it cold. Did you notice this is almost a no-oil meal ( except the fried Tofu)?

Eat healthy and enjoy!


Monday, February 20, 2017

Rainy morning and my cuppa - Lemongrass-Mint Tea

It is pouring since morning. Amidst the gushing flows of water I can also hear one or two birds chirping! What a soothing sound to the ears!
While watching the raindrops trickling down, I felt the urge to make strong tea. Tea infused with Lemongrass and Mint.


Like anything else, Tea is something very subjective! My husband likes black tea with Ginger, while I make Tea with milk and other spices. And making a Tea is a fine balance - a right balance between water, milk, ginger and spices.


I first saw Lemongrass in the markets of Mumbai, which is being sold as "Nimbu Ghaans". I never paid attention to this herb, until I was introduced to Thai cuisine during the later stages of my life. Lemongrass is generously used in South East Asian cuisine. The Parsi community in Mumbai also uses Lemongrass in their Tea. One of my friends from Gujarat served me Lemongrass tea one afternoon and ever since then, I am in love with this Tea!! I was so determined to master this Lemongrass Tea, that I went to nursery to buy Lemongrass plant, so that I always have a fresh stash of Lemongrass at my disposal!

Lemongrass is easy to grow, it is drought and frost resistant. My Lemongrass plant is over a year old and nothing can beat the joy of plucking Lemongrass and Mint from my balcony garden and making strong, aromatic cup of tea!


Here comes the recipe of Lemongrass Mint Tea ( makes one cup)

  • Water - one cup
  • Milk - 1/2 cup
  • Tea leaves  - one spoon
  • Sprigs of lemongrass - roughly chopped - 1/4 th cup
  • Roughly chopped mint leaves - 1/4 th cup
  • Green cardamom pods - lightly crushed - 5 or 6
  • Sugar ( optional)


Process:
  • Heat water in a pan. Once it has started boiling, gently pour lemongrass, mint and cardamom pods. Let it boil for 3-4 minutes
  • Add milk and lower the temperature slightly
  • Add tea leaves and let it boil in simmering heat for another 2- 3 minutes. Let the tea get infused with aromatic and delectable herbs. Sugar is optional at this stage.
  • Strain into tea cups and serve warm!
So raising a virtual cup of cheer to all of you!!