Wednesday, November 2, 2016

The squirrel in our balcony

                  This year when I thought of making a Halloween costume for Lil S, I had no other second thought, but to feature the grey squirrel. The grey squirrel family, which has been regular visitor in our balcony for the last 3 years has been our source of joy ( and anger at times as well)! But instead of making a grey squirrel costume, I went on to adapt a golden squirrel theme ( just to get the brighter color!)


                    Eastern Gray squirrel in wild doesn't have a big life span. Their chances of survival increases as they mature. It is funny, that most of the squirrels in our balcony have certain physical attributes which makes it easier to track each of them individually. One of them had a scar in her ear, we named her as "Kaan-Kata" ( pierced ears). She has a very fiery attitude and she was the most regular visitor. Be it rain or cold, she would not fail to make her presence known twice in a day , once around breakfast time and the  last was at dusk. More funnier tidbit is, most of the squirrels disappear in weekends!! Yes, I don't know how, but on weekends they are fewer in number!

                    And we named them - Chiko, Genu, Kaankata, Podmo-Korno, Chidro-Korno and a host of others! It's no wonder that Lil S loves feeding them. He insists on giving a handful of peanuts to them every time!

              Preparing the costume didn't take much time and it was pretty much free handed stitching. I bought a footed pajama . It was a bit bigger, so I had to slightly alter the length .
           
             Next I drew outline of ears, and made ears with Felt pieces. Nose and whiskers were made up  of  fuzzy stick and woolen bead.  Tail was stuffed with artificial cotton. All the supplies can be found in a local craft store.


             Once these were done, it was time to stitch in the pieces to the pajama. I also made an acorn cutout and tried to put in the front, but could not come up with a clever way to put an acorn across the front zip.


      It was Lil S's first Halloween and watching my big and lil squirrel playing in the grass was such a joy! Happy Halloween folks!

Monday, October 17, 2016

Indian version of Momo!

It is not any surprising fact how food cuts across geographic boundaries. For instance,some of the culinary dishes  from Nepal has some similarities with food from China in terms of content, texture and how they are being cooked. Here I'm talking about Momo or dumplings. Momo is also common in some part of Northern India. When I googled about Momo, I came to this exhaustive  list.  Wow, there can be so many varieties of dumplings, I told to myself!! Right from sweet fillings to vegetables, Tofu and what not!

While growing up, I never had Momo. I first sampled Chinese dumplings at Bellaire Boulevard in Houston. One of my Chinese friend introduced me to this Chinese delicacy and I have enjoyed it henceforth. Bellaire Boulevard looks like Mini China. With all the signs interpreted in both Chinese and English, lots of Chinese grocery stores around the street, it is sometimes hard to believe that this place is tucked in Houston! Apart from sampling Chinese food, another good reason to visit Chinese market they have lot of vegetables which are also commonly eaten in India but cannot be find in Kroger or HEB or Walmart.
Bellaire Boulevard, Houston,  picture source: Wikipedia


Few months back, one of my friends from Nepal treated me with home made Momo. Be it Chinese dumpling or the Nepalese Momo, both had one thing in common - simple ingredients and a spicy dipping sauce. And my friend from Nepal also taught me the secret ingredient for Momo cover  - Gyoza Potsticker wrapper. It makes the whole process so easy!

I made Momo couple of times at home following her instruction. But I deviated. And I have to admit while the traditional Nepalese Momo or Chinese Dumpling doesn't require to precook ( or saute) the stuffing, I gave it an Indian twist by putting Masala and frying the vegetables lightly before they are being used as filler.

I also enjoy the simple yet delicious Chinese dumplings. . Stuffed with rice noodles, Tofu, Spinach and other things, I'm not an expert to suggest cooking variation of  Momo, but with my growing enthusiasm of trying quick and easy recipes, I thought this is appropriate to share the recipe here.

Recipe:

Momo wrapper : Gyoza potstickers ( available at most of the Supermarket. Thaw for half an hour before you are ready to put in the filling)

For stuffing ( Makes about 10-12 Momo)
1/2 cup shredded carrot
1/2 cup shredded cabbage
1/4 cup chopped beans
1/4 cup crumbled Tofu
1/2 tsp grated ginger
1/2 tsp grated garlic

I used a food processor for grating the veggies. One of the key steps here is the vegetables should be finely and evenly chopped.

Dry masala powder:
Roast together 1/2 tsp cumin seeds, 1/2 tsp coriander seed, 1 dried red chilly, 1/2 inch long cardamom stick. Grind it to a fine powder and keep aside.

Preparing the filling:
Heat oil in a pan. Once it is ready, put the shredded veggies and a little bit of salt. Keep stirring. Once the raw smell is gone, Put the dry masala powder and mix together everything. Don't overcook the stuffing, as later they will be steamed for 15-20 mins!


Preparing the Momo:

Thaw the Gyoza pot stickers. Once they are ready, they will easily pull apart from one another. Take a small bowl of water. Put a small scoop of stuffing at the center of the pot sticker. Lightly water around the edge.Now pull both the edges together to give the shape of a half moon and press it lightly so that the edges stick together.
I used a bamboo steamer to prepare Momo. In a big wok or pan, put enough water ( so that the steamer when placed inside it, the Momo receives steam but does not get in contact with water). Let it come to the boiling point. Place the Momos in basket leaving a little space between them. I had a two tier basket and after 10 minutes I changed the order of the basket so that all the Momos gets cooked evenly. Let it steam for good 15-20 minutes. When the Momos are done, the color will change from opaque to translucent.

Recipe for Momo chutney:


This is the best part of the dish.  While Momo is quite plain and simple, the chutney has a fiery kick in it! Chutney making doesn't consume much time and can be done simultaneously while the Momos are getting steamed.
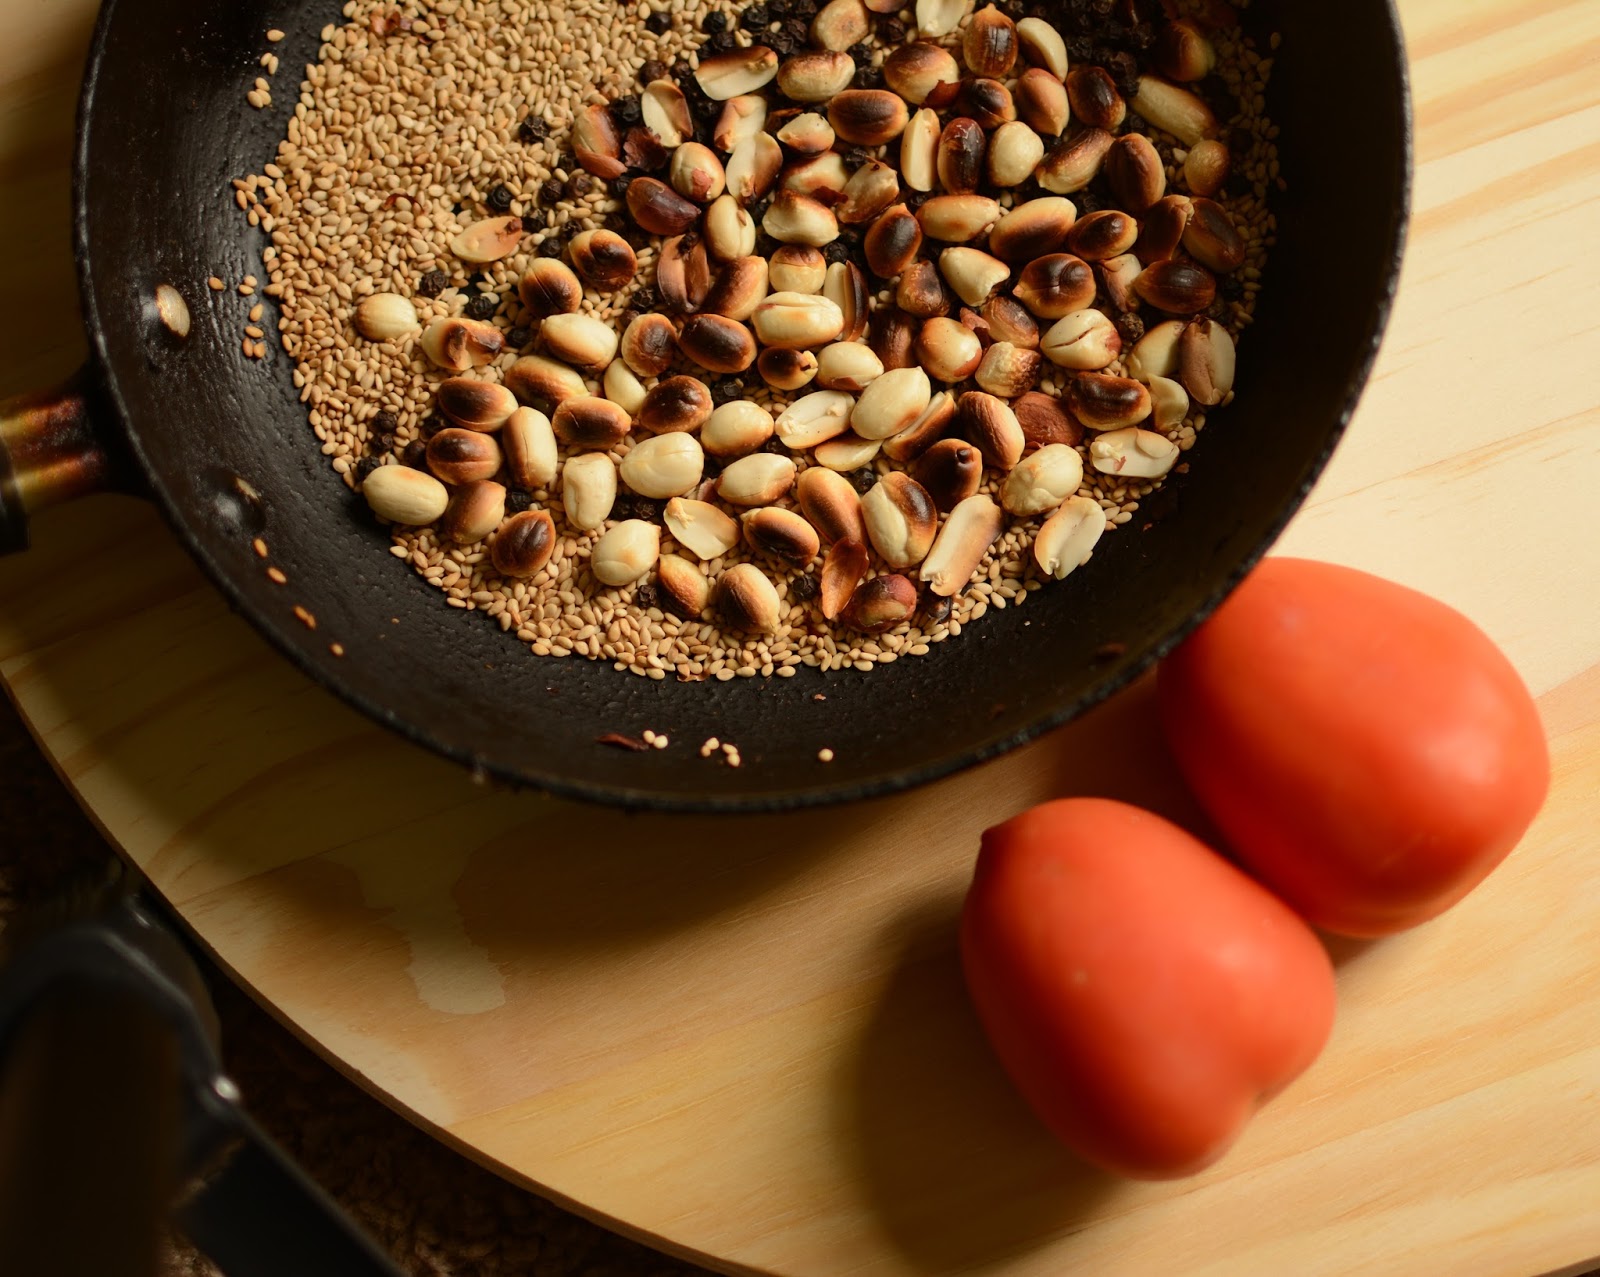
Ingredients :

Half cup white sesame seeds
Two spoon black peppercorn
Handful of peanuts
Two ripe tomatoes

Method:

Dry roast the peanuts. Once they are done, during the last 20 seconds, add sesame seeds and peppercorn. I love the smell of this mixture! Remove from heat and let it cool and then roast to a fine powder. Now dry roast the tomatoes.Make few incisions and put in a pan without oil . Once it starts getting blackened, mash it with the back tip of the laddle. Let the water ooze out. It might take 8-10 minutes to get rid of the raw smell of tomato. Remove from heat. Let it cool down and puree it in a blender. Now mix together the roasted powder and the pureed tomatoes! The taste is tangy and fiery!


Serve hot Momos with Chutney and enjoy!


Thursday, September 8, 2016

Tales of Polash on my denim blouse

Although it is almost Fall in this part of the world, but I just finished engraving a tale of spring on one of my denim blouses. A pretty basic denim blouse got some face lift, courtesy : some quick embroidery.


A stalk of Polash almost resembles like a sprig on vibrant orange flames. Usually by end of March, Polash trees burst into bloom and rejoices the glory of spring. . I remember the big Polash tree which stood close to my Art school. We spent many afternoons collecting the Polash flower and then soaking them in water. After couple of hours the water used to turn to a sweet orange hue. Some people use that orange colored water to dye their clothes. Some use Polash to make a garland. In West Bengal, the traditional spring festival ( Holi) will remain incomplete without the decorations with Polash flower.

I had this Denim blouse lying in my wardrobe. I like the texture of Denim and thought of adding more color to it to give a complete and personal look. Since my high school days, I developed serious interest in surface embroidery. To me, surface embroidery is a way of liberating my thoughts into another canvas.

This time I didn't trace any outline of flowers. I let my imagination guide me and I thought nothing is more sweeter than the perfectly imperfect flowers! With a toddler around, it took slightly more than a month to finish this project. I used Kashmiri stitch to fill up the flowers. Sometime later I will probably write a small tutorial about Kashmiri stitch.


And here is look of the completed project.

The above  picture doesn't do justice to the original project. But hey, it was a fun project!

And here is the final look!


Friday, August 5, 2016

Lentil-Quinoa salad

I have been always fond of Lentils. Lentil soup, as we say it in our language, Daal, is an integral part of my diet. But I was never exposed to the idea of Lentil salad until I first tested Mediterranean cuisine! I have been to Egypt couple of times and among the various things I enjoyed over there, Egyptian food was simply heart warming! Simple, yet it has tasteful combination of spices and vegetables.

Couple of weeks back P and I were talking about healthy dinner options and the idea of making a Lentil-Quinoa salad struck me. Till date Quinoa is not so common in India. And that shouldn't be a surprise because historically Quinoa was first domesticated in South America. I was reading about the history of Quinoa and found out that the Incas had a high regard for Quinoa. Traditionally, each year the king used to plant the first tree! This seed has an impressive journey for the last 500 years! With the Spanish invasion in South America, Quinoa was replaced with cereals and cultivation of Quinoa was suppressed. From 1970 onwards Quinoa cultivation again gained momentum.More on this can be found here

So finally I made this Lentil Quinoa salad and tried to infuse both Mediterranean and South American style. For the last two weeks we are eating this salad for our dinner. Assembling the different ingredients might take some time, but at the end we were happy souls! There could be lot variations for this salad, the more the merrier!

Recipe for Lentil -Quinoa salad ( serves two)

Ingredients :
Unhusked red Lentils -1 cup
Chick peas- 1/2 cup
Quinoa - 1 cup

Embellishment/toppings
Tofu - 25g ( for marinade : Tomato Ketchup - 2tsp, Soya Sauce- 1tsp, garlic paste-1/2 tsp and bread crumbs)
Boiled eggs - 2
Avocado -1
Asparagus
Carrot peels -
Chopped onion
Chopped cucumber
Chopped tomatoes
Roasted nuts
Dried cranberry
Lemon juice
Parsley sprigs

Spices :
Rocksalt
Roasted cumin powder : 1 tbsp
A pinch of Oregano
A pinch of Rosemary
Roasted seasame seeds
Chilly flakes


Method :
Soak red lentils and chick peas for 6 hours. Wash them thoroughly and boil them in salted water for about 20 mins. They should be soft. Boil Quinoa in a separate pan ( see the packet for instructions, I had to boil them for about 10 mins). Mix together the lentils, Quinoa in a big bowl , add lemon juice and cumin powder. Check salt and leave it refrigerated.

In the meanwhile prepare a marinade for Tofu. In a bowl mix together tomato ketchup, Soya sauce and garlic paste. Cut the Tofu in small cube and marinade them for half an hour. Coat the marinated Tofu with bread crumb and fry them.

The embellishments make the salad interesting. I did add boiled eggs, sliced Avocados, grilled Asparagus, roasted peanuts, handful of cranberries and chopped carrot, onion, cucumber. But you may add according to your liking and make it even more interesting.

The last part is assembling. Add your favorite toppings with the Lentil Quinoa salad. Add the spices. We like it cold. Did you notice this is almost a no-oil meal ( except the fried Tofu)?

Eat healthy and enjoy!


Thursday, July 21, 2016

Ready for a sip?

          Last few weekends have been quite busy for us. We had a great reunion of friends at Hershey,  followed by another visit to NOLA followed by Lil S's big birthday lunch followed by P's B''day when we drove to San Antonio! In the middle of all this I also started weekly volunteering to the local library.
But now we are back for good. No more weekend trips, at least for a month or so :-)

I was missing my blog. So today morning I thought of sharing an easy cocktail recipe! I made this for P's B'day and we both enjoyed it. Luckily this year P's B'day was on a Friday, so we could enjoy the evening to our heart's content.

 I had never used Triple Sec before, but I must say that I liked the taste. The staff at local Specs was very helpful to give me a hand in figuring out the right shelf!

Indulge this cool drink while you relax in your bath tub!
Water melon cocktail 

Recipe for Water Melon cocktail ( for two):

Water Melon juice - 1.5 cup
Vodka - 1/2 cup
Triple Sec- 1/4 th cup
A sprig of mint
4 tea spoon of lemon juice


  • De-seed Water Melon and blend it. Strain it and leave it refrigerated with the mint leaves and lemon juice for half an hour. ( I use the tender mint leaves at the tip of the stem)
  • Mix Vodka and Triple sec in a high ball glass and stir it
  • In tall flute glass serve Water Melon juice with the Vodka - Triple Sec
  • Your concoction is ready!
Get refreshed with this drink!


Monday, June 20, 2016

A quick dessert : Rose Cake

Some food are always intertwined with memories. Memories of the town where I grew up, my school friends, our families, our community. Like this one on Rose cake....

Years back, almost 20 years back one of my dear friend's Maa ( Kakima , as I call her) served this to us in an afternoon. It was bit sweet and a bit of crunchy. And I was intrigued by the beautiful floral shape! Kakima told the name as Rose cake. I was not into cooking at that point of life. Never asked for the recipe or any other details of the process. But somehow the memory of the rose cake etched a strong impression on my mind.


Years passed by. My friend Buntu and I went to different city to finish our education. Orkut or FaceBook had not made their presence in social circle, so sadly we didn't had email contact of each other. In 2007 I first visited United States and heard back Buntu's voice once again after ages! Again the spirit of our friendship started kindling up! 

 A friend is there to listen to my frustrations, my whimpering, my questions and all other trivial and non trivial things! Buntu and I have studied together in the same primary and high school. When I look back, memories of roaming around on our cycles, going to movie together and doing silly things flocks into my mind!

2015 Kakima was in USA after a long gap! And this time, I made no mistake, I had to put a meaningful end to my quest of Rose cake! So after long 20 years or so, a phone call , a WhatsApp session resulted recreating the same in my kitchen! More detailed inputs came from Kakima - the recipe is common among Keralites as Acchapam!

Below is the recipe from Kakima, I tweaked a little bit rice flour in it to add more crunchiness. It is a quick recipe. The preparation hardly takes any time, frying is the only time consuming part. I purchased the mould from Amazon


Before I type down the proportion, few words :

  • I fried the rose cake in a wok
  • Like any other deep frying stuff, the temperature of the oil needs to be sufficiently hot
  • Each time , the mold needs to immersed in hot oil for at least 1 to 1.5 mins before you put it to the batter. 
  • Slowly put the mould in the batter and then place it out it to hot oil. Shake it gently , the rosette will slowly leave the suface of the mould
  • Do not immerse the mold completely inside the batter, it might be difficult to shake off the rosette
  • As you keep frying, you might feel the batter has become thicker, please add some more milk to it
  • If you decide to change the mould shape in between fryings, proceed carefully, the mould will be very hot.
Recipe :
  • 3/4 th cup all purpose flour
  • 1/4 th cup semolina
  • 1/4th cup rice flour 
  • 1/2 cup ground sugar
  • 1 egg
  • 1 tea spoon baking powder
  • Few drops of vanilla essence
  • 1/2 cup milk or slightly more ( remember this should be more thicker than a standard pancake mix. We are trying to get the batter get adhered to the hot mould)
  • Oil for frying
Whisk all of the above ingredients to a thick smooth consistency. Heat oil in a wok. Put the mould and let it heat up sufficiently. Dip it in batter and put it back to the hot oil slowly. Shake gently when the rosette will slowly leave the mould.

This is sweet yet crunchy dessert. As a variation you might drizzle Maple syrup on the top it or eat it up just on its own!!


Serve these hot so that you can savor the crunchiness!
Bon appetit!

Thursday, June 2, 2016

Little shoe print - Father's Day craft


As a kid we were never aware of  Father's Day or Mother's Day and hence we never celebrated them in India. Greetings card were meant for birthdays and New Year. No one knew about Hallmark or Archie's Gallery.
Greetings card were mostly hand made.
Those were  white colored blank greetings card where we would draw pictures, decorate with some stickers or die cuts and put up a favorite quote.

Slowly things changed. With globalization , everyone is caught up the fever of  "special day". I sometimes forget the count of these special days. There is Friendship day, Rose day,Valentine's day and lots of others. Am not going to debate on whether we should celebrate these or not, but sometimes I feel it is beautiful to express affection and warmth on these special days.

As the Father's Day is approaching, I thought of making a handmade card for Lil S's Baba! We used felt sheet, little bit of ribbon,lots of glittery color and off course the shoes for imprint!

And if you wonder why I am into making a hand made card, the reason is both of my parents are creative and energetic.  Amongst the many teachings they instilled, they also helped me to develop an affinity for doing DIY.
 My father even made a Guitar for himself. Those days there was no YouTube, figuring out a new project all by himself must have been tough, but he did it!

Creating best out of the waste was my brother's mantra! I remember instances when he would save shavings out of pencil and would put them to decorate a greetings card! When I look back at these memories I feel sad that many of these projects have been misplaced. I don't even have a picture, they are only etched in my memory.

Back to today's project. The project is fairly simple, with a toddler who is always grabbing my legs, standing next to me and try to reach things out of the table, I could use only 15 mins or so to create this project.


I had fun in making this project.

Each day we try to make Lil S grow up to a responsible and respectful adult.Whether you celebrate the Father's Day with a card or with a hug, let us enjoy the little things! And Father's Day is probably not only meant for our Father, but can be extended to the other Father figures in our lives.

Did you look into our previous attempts of toddler craft? They can be accessed from here

Monday, May 23, 2016

Crafternoons - little joys of life

Art is very therapeutic for me. I can spend hours in shaping up a soft ball of clay and see how beautifully it takes up a shape or can spend an  entire on-flight time to embroider on a wrap-around skirt!

Art is kind of like story telling, the imagery evolves slowly, but distinct yet.
Art is also kind of cathartic, helps me to forget the stress.
Art is fun.

Doing fun art with Lil S is another thing. I have to be quick and have to keep an eye on everything. Lil S has the tendency of putting everything to his mouth. ( But off course when it comes to eat his regular lunch/dinner, he refuses it vehemently!).

We did few "art n craft" sessions and I can tell you from my experience, doing a craft project on a carpeted floor definitely makes your reflexes go faster!

I never knew before that hand prints can be turned into so much fun objects. But if you take a look into Pinterest boards, there are lot of ideas floating around. Apart from hand/foot print,we added other things like twigs, dry leaves to add more interesting texture. Once you start creating there is no looking back, you can draw inspiration from every thing around you!

None of these projects were completed in a single session. Getting one decent foot/hand print is enough for the day! While he napped, I added embellishments and tried to give a complete look. Did I tell you that I figured out getting footprint out of Lil S was easier than getting his hand prints? And did I tell you keeping a wet sponge ready or be close to the sink also helped in the aftermath of the "art session"!

 Here is a  list of the art projects we did together!
Meet Mr. Toucan and Lil Sparrow ( made with Rose leaves and some other dry leaf)


Meet the Mamma owl and baby owl duo


Meet Goldie and her buddies


Meet Mr. Minion , a bit confused about everything

Meet Mr. Sniff and Mr. Scurry


Meet Mr. Jelly Belly!
.

Our projects may not turn out perfect always, but nevertheless, we had fun in dabbing colours together.

And before I end, here is one of my favorite quote

"To practice any art,
no matter how well or badly, 
is a way to make your soul grow
So, do it"
~ Kurt Vonnegut

Friday, May 13, 2016

Turning kitchen leftovers into something else

It's summer time.

Am getting ready for my kitchen garden. As I sow seeds or young saplings, I also like the fun of turning kitchen scrap to something more meaningful!

Almost every summer I grow Pui Shaak ( Malabar Spinach). They are easy to propagate from stem cuttings. Cut below one of the leaf node and pot them in moist soil. Once you pot them , it might take two - three weeks for the first set of leaves to appear. While they are getting ready, I keep them in a slightly shaded area and then there is no turning back! Malabar Spinach is quite a hardy plant.
Give them ample sun, ample water and love! They will definitely make you happier!
So, next time while you are chopping the Malabar Spinach for making your veggie medley, don't put everything in the wok, you can save a part of it put back into the soil, wait for few weeks and let Nature do the job!
Young leaves have started to appear. This almost took around 3 weeks. Be gentle while watering; roots might take another couple of weeks to penetrate deep enough in the soil

As we are talking about kitchen leftovers, that reminds me to share another good idea. Save the egg shells, pulverize them to coarse powder and use it as a Calcium supplement.

Somewhat coarsely grinded egg shells
Go green and happy gardening everybody!

Friday, May 6, 2016

Saturday morning

Saturday mornings are like new promises unfolding slowly.

I can hold the cup of tea a bit longer. Can have a long gaze at my balcony garden and carry on a silent conversation with my greeny winnies.

Saturday mornings are a happy start. The kitchen seems a lot slower on Saturday and it should be!

I had not baked anything for a long time. A kind of inertia effect you may say! I was feeling a bit nervous about the proportions. But still the thought of a room filled up the smell of Carrot cake was a strong motivation to start the process of baking a cake.

While I sometimes hesitate on baking, on the other hand ,  my Maa has strong interest in baking. She bakes good cake and Nankhattai ( semolina cookies). Her cakes are simple, yet tad more delicious from the ones baked from stores. Back in 1980's when she started baking, microwave ovens had not make an appearance in the market. Maa had a simple electrical cake oven. It was probably Murphy brand. Sometimes the coil used to wear out and we had to get it fixed.
It didn't had any temperature control, but still the baked cakes were yummy.

Her ingredients were also simple - Vanilla essence and dried fruits. I have memories of helping her during the baking process. Sometimes she would ask me to whip the eggs or sometimes I would cut the butter paper in circles which would be used as a liner in the baking tray.

I looked into few Carrot cake recipes from the web and did little changes. The end results were very gratifying!
There is nothing better to me than sitting on the balcony with a huge coffee mug and savor a slice of Carrot cake!

Recipe for Carrot cake :

All purpose flour : 2 cups ( sieved)
Oil : 1.5 cups
Eggs: 4
Baking powder: 2 tea spoon
Cinnamon powder : 2 tea spoon
Ground Sugar : 2 cups
Salt : 1 tea spoon
Grated Carrot : 1.5 cups
Grated Coconut: Half cup
Sliced almonds : Half cup


Sieve the flour. Whisk the eggs thoroughly. Now mix together the flour, sugar, oil, eggs, salt and baking powder. You may do it manually or use the electrical cake beater.  Fold in the grated Carrot, Coconut, Almonds, Cinnamon powder as well.

In the meanwhile grease the pan, and dust it with flour lightly. I used a 9 by 13 inch pan. Preheat the oven at 325 degree C.
Once it is ready pour the batter and let it bake at 350 degree C. I baked for 35 mins and had to use another 15 mins of standing time.
It is not that difficult. Once you have the ingredients in your pantry, it is really easy!
Lil S trying to get his share as I try to capture an image

Thursday, May 5, 2016

Clouds are lovely!

The breaking waves dashed against the rocky coast


I sat by the sea and she whispered where do you come from?
A spring day weekend at Galveston.


Tuesday, April 19, 2016

The day that dawned differently

The phone was vibrating. It was past midnight. A flood alert has been issued.

Winds were howling outside and there were flashes of thunder.

It is a big day for Lil S and us as well. S was going to start his day care. I looked at him, sleeping peacefully in his crib next to us. P was in his night shift, he was supposed to get back home by 800 AM. I felt a little uneasy. Houston gets water logged very quickly, will he be able to make home safe, I thought and drifted back to sleep.


As the dawn broke, there were series of weather alerts in my phone. I called up the daycare, automated voice message told me due to inclement weather the day care is closed.
I felt like a little girl, who said "yay, rains"!

Outside the windows, trees were swaying with the downpour.There was watery silence everywhere - the steady drift of water on the bark of pine trees next to our balcony, the swimming pool brim almost overflowing. Raindrops seemed to have kissed the Kalanchoes and Jasmines.


P called back from work and asked if we are going to  have Khichuri for lunch!


The best thing about rainy day is to eat comfort food. Nothing quite compares the joy of having piping hot khichuri and spicy fries on a rainy day.
A Khichuri is a hearty meal made up of rice, lentils and veggies, served with a dollop of ghee (clarified butter).
Our lunch plates looked like this : Khichuri, dim bhaja (omelette), potol bhaja (pointed gourd fries), tomato chutney. I also made a drink of green mangoes!
I meant to share the recipe of green  mango juice or aam pana. Ideally a green mango is roasted in open fire. Pulp is extracted, mixed with spices to create the drink. But I don't have a ready access to open fire, I had to resort to simple boiling .

Recipe for aam pana /green mango drink  ( serves 2)

1 green mango
1/2 teaspoon of grated ginger
Roasted spices :2 teaspoon  (1 teaspoon cumin, 1 teaspoon coriander and 1 dried red chilly slightly roasted, crushed to powder)
Rock salt : as you need
Sugar as you need
Water to boil

Method:

  • Wash the mango and chop it into big chunks
  • Bring water to boil. Add the grated ginger. Add a pinch of rock salt and sugar
  • Add the mango pieces, cover it and let it boil until the pulp becomes tender
  • Once it is soft, turn off heat and let it cool completely
  • Scoop out the mango pulp. Add the roasted spices, rock salt and sugar. Your concentrate is ready.


For serving : take generous scoop of the mixed pulp and add to cold water. Add more rock salt and sugar and enjoy!


Tuesday, April 12, 2016

Half tone

The other morning, I was feeling a bit feverish . Baby S was up all the night and so was I.

Early in the morning I fell asleep for sometime, but when I woke up, I didn't feel fresh. I was dragging myself. Maa could feel that am feeling heavy and feverish. When she came back from market, she presented me a box of oil pastels!

 As I opened the box, I could recollect the familiar smell of childhood, when a box of oil pastel would accompany me on quiet summer afternoons. I haven't picked up oil pastels for a long time and I was not sure what am going to draw. The box had 50 shades of pastel and a scraping tool inside. As I was looking at the box, I saw at the back of it there is a small list of possibilities that could be achieved with the pastels! And somewhere it did mention "scraping".It did capture my attention!

So I tinkered in oil pastel for the next couple of days and am happy that my Maa had urged me to try colors!

The art of scratching or sgraffito is an old technique, but I had never tried it before. I had no expectations of the final outcome when I picked up the scratching tool. Essentially, one keeps on covering a surface with layers of color ( ideally from light shades to darker shades). Once sufficient number of layers are done, it's time to scrape off  ( it could be anything : knife/bamboo skewer or any other pointed object) to expose the texture and shape of an image.

 As I kept on scraping, I felt like sharp rays of light emanating against dark background. I felt like I was liberating an image beneath the layers of darkness.

The box of Camlin Kokuyo Oil Pastels was almost of buttery consistency, the pastel sticks did slide on the paper effortlessly.

Here is my work! The inspiration for these sketches are drawn from various sources on the internet.

Stages of layering


Image inspiration : Art work of Shri Sudhi Ranjan Mukherjee, Shantiniketan.


One can add more variation by doing a mix media project : instead of using a normal art paper, use a pastel board ( clay added to induce more grainyness/friction). For beginners, another tip would be to use stencils, instead of sketching from scratch.

There are loads of inspirational projects available on internet. Read more about this from here:sgraffito

Saturday, April 2, 2016

Travelogue - 2016 short spring break

I spent a lot in lands afar
I've gone to see the mountains
The oceans I have been to view
But I haven't seen with these eyes
Just two steps from my home lies
On a sheaf of a paddy grain
A glistening drop of a dew

As a family we always have enjoyed traveling to historic sites and we always had the notion that in order to visit history we need to have a train/plane ride . Couple of years back I first read about Chandraketugarh in one of the local newspaper. A site in North 24 parganas , where historical relics dating back to Maurya age have been excavated. I was  surprised realizing that the site is not afar from our residence in Kolkata. This spring, we decided to visit Chandraketugarh.
 The GPS showed that it is a fairly straightforward route, via Taki road and our destination is only 40kms away.
It was Good Friday weekend, the city roads were fairly quiet.
As we drove past Madhyamgram, the cityscape was replaced by greenery. Maa and Pupu had packed grilled sandwiches and sondesh, we savoured them enroute.

At Chandraketugarh there are two prominent look outs- the mound of Baraha-Mihir and the ancient fort of Chandraketugarh.The mound of Baraha-Mihir lies close to present day Berachampa. Archaeological digs were carried out in 1956-57 and it revealed the remains of a polygonal brick temple.

A 5 mins drive from this place leads to the second look out, unexcavated mound of ancient fort city Chandraketugarh. This site is covered with trees and on a first glance it looks more like a park than a fort.

Chandraketugarh was important city 2500 years ago. Being at the close proximity of the rivers Ganga and Padma, Chandraketugarh was an important port town of past. It has yielded silver and copper coins, terracotta figurines, beaded jewelery, various objects of metals and bones.

Many archeological remains were discovered by the Ashutosh Museum of Calcutta University. A significant amount of old relics have been collected by Shri Dilip Kumar Maite, who is a native of the place and also an avid history enthusiast. His residence has a small mueum which is open to all. The humble museum has impressive displays of various kinds of artefacts. We didn't get a chance to meet him, but his son was kind enough to show and explain the significance of the exhibits.
History enthusiasts may also go through his books on the history of Chandraketugarh: "Itihashe Deganga" and " Chandraketugarh ".


Apart from historical significance of the area, there are more earthly pleasures. We took a casual stroll in the adjoining village. Lovely morning light came filtering through the bamboo forests. An elderly lady was on the process of boiling parboiled rice. Unhusked rice was being boiled in an open stove top.

 Flocks of ducks were wading a quiet pond.

My niece and I collected green mangoes which had fallen off from branches.


The stillness of the morning was often getting punctuated from hammering sounds coming from local metalsmith's shop.


Chandraketugarh is not the most evocative of all the Maurya era relics, but still is delightful.


The sun was almost over head. Before heading back we savoured a bit more the greenery around us and the wonderful feeling of long lost Maurya age air on the skin!

Thursday, March 31, 2016

Wall it up!

It is the time again. 2016 Bidhansabha elections of West Bengal is about to commence soon and political parties have put up their slogans and symbols on every corners to woo the voters. The tradition of writing in the wall often irks private property owners, but virtually they have very little power to oppose to this.

 In the past political campaigning meant witty humorous limericks, often laced with satire on the boundary walls, store shutters. While strolling in the neighborhood,  this year I saw mostly symbols of the parties and the name of the contestants.
Some of the lettering were simple...others had a bit more dimension to create certain dramatic effect.
I also noticed that there was virtually no campaigning for Communist Party of India, which once ruled the state for long 34 years.

Here in this photoblog I present some of the sample lettering. This account, by no means is to spread any kind of favor to anyone!
Simple lettering accentuated with offset, shadow effects

An addition of spray painting on top of black added a contrast
This lettering looked different- one of them depicts a worn out wall, another shows a shattered wall as if a bullet went through. If you zoom up and notice carefully, you can spot grass flowers springing out from the shattered wall!!!

Tuesday, March 29, 2016

She

The other day while I was going to pick up some grocery, I saw a woman selling veggies in a cart at the corner of our street. I haven't seen her when I came home last time.
I dropped the idea of going to the market and decided to pick up my list from hers. Tucked in a yellow saree, and a shy smile she looked ordinary yet confident.
During our conversation, her accent didn't sound like Maharashtrian. She said she is from Tamil Nadu. We finished our business, and we broke into a small chit-chat.
I was in Koperkhairane after almost 14 months. There were few changes in the neighborhood... Some new shops have come across the corner. Casually I asked her if she knew the specialities of one such "new" shop around the corner.
With a broad grin on her face, she replied she owns it!
She wakes up quite early in the morning and makes fresh Sambar. Big aluminum steamer gets busy in preparing soft pillowy idlis. After the initial breakfast rush is over at her shop, she heads off to the retail market to get veggies, which she sells in her cart during late morning. Evenings are busy again as she has to prepare the batter, set it to fermenting in preparation for the next morning.

In between all these, she is being ably assisted by her daughter who is in 7th standard and her husband, who also sells newspaper.

In the back of my mind, I could not but appreciate this hard working couple. A immigrant family who is satiating the needs of a busy metropoly and hopes to make it big some day!

New beginings

My first steps....and yay I have created!

When I was a young student at school, I had enjoyed writing. One point of time I used to dream about being a Journalist where I could exercise my passion of writing! But as it happens, slowly with time, I drifted  away from there.

This place over here is going to be a repository of the things which I like - arts, crafts, gardening and other general things about life and also blogging!

If you happen to drop in, please wave a hello, so that I know am not talking to myself! Thank you!