Friday, November 24, 2017

Kitchen garden from scraps

This is perhaps going to be the last  "garden"' post for 2017.

Winter is setting in Southern Texas. My balcony garden is still growing strong. The bitter melon climber has taken almost the entire garden. Indian flat beans is also beaming healthy.

I feel happy when I look at my garden. Most of my babies are my own, they are not from nursery! Most of them are forgiving as well and each of them have an unique story!

The other day as I was wiping off the kitchen sink, I saw this!

For the uninitiated, this is a half used Garlic pod, which was left unkempt at one of the corner of sink. But, I guess, Mother Nature decided to intervene here, and hence you can see the new roots and shoots popping out of the pod! I have faithfully transferred the pod to my garden, let's see what happens!


Today I want to talk about how I use kitchen scrap to regrow my garden. As I said, I don't visit nursery often. I regrow from leftovers, I collect seeds from veggies and fruits and regrow them - in old containers, milk tins etc. Here is my previous post on how to reuse kitchen scraps.

This year I am growing Ginger in my garden and am satisfied at the moment with its growth and vigor. Select a piece a piece of Ginger which has a bud/eye in it and pot it. The area should be sunny, but not under direct sunlight.
Ginger plant re-grown from Ginger root

An easy recycling project comes from the milk powder containers. Agreed these containers are quite small hence can house only small plants , but still there is no harm in potting some annual plants! The tin containers can be given makeover with acrylic paint. And , oh yes, don't forget to make some holes at the bottom of the container!


Milk powder container to gardening pots

I often use egg cartons as seed starter. This helps me to prevent overcrowding.


 Growing Fenugreek ( Methi) here

Some veggies are just magical, you can regrow them over and over again!
What do you do with the left over spring onions? New sprigs can be easily grown from the left over pieces. Soak the white part ( root) in water for couple of days before re-potting them into soil.


Regrowing spring onions
Did you know that food tastes way better when you grow them in your own garden?!!

Sunday, November 5, 2017

The pied piper of Hamelin - Halloween costume

Sometimes I wonder how the festivals across the world are tied to an invisible yet unified spirit. Although thousand of miles apart, but the celebration of Bhut Chaturdoshi in India ( mostly in my state West Bengal though) has almost the same theme with All Soul's Day in Europe, Halloween in USA and Day of the Dead in Mexico! And the dates of celebration also  coincide with each other.

Bhut Chaturdoshi is a way of remembering our forefathers. This festival also coincides with Diwali, the festival of lights. Chaturdashi means 14 and this to represent the previous 14 generations.  Earthen lamps are lit all over the home to fight off the evil and also to remember the forefathers.

Traditionally, Halloween was never celebrated in India ( but I do see it is gaining popularity now-a-days). But there were other celebrations which involves wearing fancy costumes. One such celebration was called Charak er mela, which is held in the month of April to signify the end of Hindu calendar. Another fun tradition  was "Go as you like" costume parade in the schools. Kids would dress up in myriad of ways - right from a circus clown to a tiger or a little mafia!

In continuation with my last year's tradition, this year also I decided to put up a costume for our son!
As usual I thought of using old clothes and trimmings to create the costume. Initially I had thought of creating an owl costume, but as I embarked on the project, things started becoming too colorful to be an owl. So I declared this dress as a Pied Piper of Hamelin!!


My Piper was running a fever on the eve of Halloween, so things were a bit quiet this time. Here are the steps and glimpses!

1. I ripped open lot of his old pants and shirts to create patches. Initially I traced out the design on a paper before cutting out fabric pieces. Cut out all pieces and put them in a sequence before you start sewing. Try to visualize how this is going to look!


Take out as many colors as you want, the more, the merrier! I should confess that I had used Elmer's clear glue to put the patches on the shirt before I stitched them with hand, but probably it was not a brilliant idea. But given the shortage of time, I had no other quick way of managing the project.

2. Stitch the pieces, try not to leave any empty space between the patches.

3. Once the shirt was over, it was time to get the cap  right and I used an unused grocery bag ( yes you heard right, an unused grocery bag to make a cap!!!)

4. Cut open the grocery bag

Step 5: Fold it in half and cut a little circular corner


Step 6: Turn inside out and fold again ( you may use pins to hold the corners) Stitch it


Step 7: This is how the folded hat looks. Bring together the other corners and stitch them.


Step 8: Turn inside out and you are almost done!


Step 9: Consider some embellishments? Some feather and pompom balls!


The Pied Piper dress is there!
How was your Halloween this year? Do you make fun costumes as well?!

Monday, October 2, 2017

An ode to my garden - fusible applique project 2

The weekend crafter is back! 

Last month went through a haze. I got accepted at the UoH, M.Ed in Curriculum and Instruction ( with emphasis in Learning Design Technology) and my classes started! Houston also witnessed partial solar eclipse. The clouds kept coming, so I was not as lucky as I was in 1995!! Just as the school session started we got slammed by Harvey.It created a havoc in Houston. The hurricane stalled for three days and on the top of that, Army corps decided to release water from the Barker Cypress reservoir. Some of the communities might require years to go back to the original "normal". Fortunately we were spared, but it completely  breaks my heart to see the horror stories.

I finished this applique project in one afternoon. Yes it is as easy as it sounds!I taught myself applique long ago. One of the famous applique from India is Pipli applique work. There are lots of different way in which applique can be done, but at the moment my favorite medium is fusible applique! With little imagination, almost every project can be transferred to an applique.

I had this cotton blouse in my closet, a blouse which is very comfortable but lacks a kitsch! I loved the soft pastel color when it was brand new, but now, after almost 2 years this blouse looks quite pale/ And these are the perfect project to get a makeover. To add some zing I first color dyed it with Rit and then appliqued on it! 
And this project is an ode to my small balcony garden.


The tutorial for creating a fused on applique design can be found here. I used different pieces of fabric to create hat, ribbon, body, shoes etc. Once I had created and cut all the designs, I fused them one after another to give a complete look.

One of the nice things about applique is that you can put to use the old fabrics, reuse parts of old dress. The white watering can is made from a blouse which I used to wear in 2007! Almost 10 years is gone, but it feels nice that a part of my favorite blouse is still with me!

What do you do with your favorite dresses as you outgrow them/ they grow old? Do you reuse them in one way or other? 


Thursday, August 24, 2017

Make a splash - easy iron on appliques

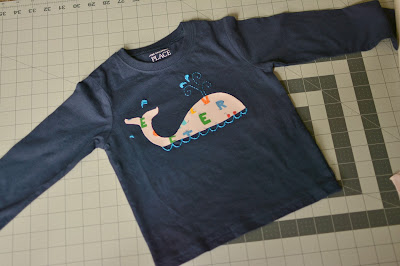
What do you do when you are left with lots of old dresses and fabric materials which have either fallen short or too dear to part with? I saved the old onesies and shirts of my baby boy with the hope of turning them into some DIY projects and at the end I think it was indeed a good idea!


Many of his T-shirts are made of extremely soft cotton; yet they are durable. And somehow I don't want to part away with them. I wish if I could turn all of them into a re-wearable DIY!

I have a huge stack of baby clothes and one of the easiest way to reuse them is to make applique! Using old fabric scraps as a source applique is kind of prolonging the memory! Lil S's Didoba ( grandmother) gave him this pastel colored T-shirt when he was  around 10 months old and now after 2 years I thought, I could use a part of this T-Shirt to create a more unique look in a simple navy blue shirt!


 I used Heat and Bond Ultrahold from Michaels Store to create my applique design. Anyone who has used this fusible sheet will appreciate this is so easy to use, even for a beginner level!

I wanted to create a dolphin applique on one of his old T-shirt ( 100% cotton).Washed it and ironed it.

  • Prepare your work area, as you will be using the iron quite frequently. 


  • Next I cut a small piece of fusible paper ( 10 " by 10") which will be used to create the applique. 
  • Place the fusible paper on reverse side of fabric ( which you will use to create the design). Be mindful when you do this step, otherwise you might end up with completely wrong side. Iron on the paper ( again smooth side of paper will face up, plastic side of paper will face towards the reverse side of fabric)


  • Iron for 30 secs ( you might have to check the time depending upon the fabric you use). The paper should firmly get attached to the fabric.
  • Draw the design on the paper and cut the fabric with a sharp pair of scissors
  • Peel away the paper from applique
  • Use iron again to attach the applique ( this time, top of the fabric will face the iron and the glue side will face the shirt ). Iron from 30 secs or so to ensure that the applique gets completely attached.
  • Your applique is ready! You could add other embellishments, like I hand embroidered the waves!! 


Wednesday, July 5, 2017

Go green - summer garden bounties!

Over the past few years gardening has become my stress buster. It gives me a sense of joy and accomplishment. There is a huge sense of satisfaction to see something in my plate which has been grown by me. Although my endeavors have been mostly confined to pots,due of lack of garden space, but still with little care and thoughtfulness growing own vegetables is  very much possible.

 What are you growing this summer? Our small balcony is facing towards West. From June onwards it becomes quite challenging to keep everything in healthy green state. Here are few tips and pictures from our balcony garden:

Chrysanthemums / Chandramallika

Chrysanthemums are quite easy to grow, this plant is almost two and half years old. Each summer it goes back to dormancy but again comes back to life when the temperature drops down during Fall. My only challenge with this plant was to save it from aphids. During spring when the stems are soft it attracts bunch of aphids which can completely stun the growth of the plant. Ultimately I had to resort to Neem oil to repeal the pests.

Begonia
Hibiscus
Two years back, a friend of ours moved back to California and ever since then we adopted her Hibiscus plant along with a bunch of others. 
Marigold
Marigold is another simple stunner. And the best part is the dry petals are the "seeds"!! I have been able to give away baby Marigold saplings to my neighbors!

Kalanchoe/Patharkuchi
Kalanchoe is one of my favorite and hardy plants. This Kalanchoe is with me for the last 7 years and have survived one frost as well!

Sweet Jasmine, they are synonymous with summer

It is a lovely feeling when you wake up in the morning, step to your living area and the sweet smell of Jasmine wafts through the morning air.
Groundnut

This is the first time I have decided to experiment with Groundnut and I would report my success or failure in the coming months!! Fingers crossed!


Potato plant flowers
The greatest showstopper for this year would be potato plants!

Potato in a pot!

I planted them around March and harvested them around end of June. Potatoes are very much possible within a pot. I planted potatoes which already had an "ëye"on it, kept adding soil as it grew and covered the top soil with discarded tea leaves to retain the moisture. At the end of the season the trees delighted me with bounties and I am definitely elated!
This is the first time I am growing potatoes and I learned quite a few important lessons:
  • As usual time/temp is quite important. Since Houston tends to get very hot by end of June, it is imperative that the growing window is quite short ( End February - Mid June) and one should make best use of it
  • Late blight or brown blotches is quite a dreadful disease which appears as a brown patch on the leaf and unfortunately my potato plants were not spared. I had to resort to pruning the affected area to get rid of this fungal disease. 
This year I also planted microgreens in my window sill. I grew spicy Mizuana. The experiment was not very successful though. May be I will repeat the experiment again later!


Indian flat beans/ shim

Indian flat beans or Shim are a tall slim, climber variety which needs support. The plant is self pollinating which makes the job easy for a gardener!


Tomatoes
Parsley

Curry patta


Red capsicum or bell pepper
Green pepper

And here are the picture of my produce :


Produce 1

Produce2


Produce 3

Green pepper pickle! Mirchi aachar

Apart from gardening updates, in a future post I would share how I incorporate reuse and recycling in my gardening endeavors! And before I sign off, hang on , please say Hello to another friend of me as well!

Meet Mr. Bob,  am sure you will be charmed by the bright red display on his throat!

Thursday, June 22, 2017

Bread pakoda

Does sight of street food entice you? It definitely does to me! Heaps of Samosa, Aloo bonda, Mirchi Vada always brings a gush of happiness and hunger inside me. And after I am done with the eating part , I always wonder had I been a food seller, would I have been able to sell things without gulping them down? Who knows..may be at the end of the day I would have only fed myself instead of selling to the customers! Yes, such is my strong affection towards certain street food.

Different states of India have their own pet peeves when it comes to street food. And here I present one of my favorite street food from Maharashtra, the ubiquitous Bread Pakoda. The recipe can be deconstructed as sandwich dipped in a batter of chick pea flour and deep fried! Bread pakoda brings a zing in your taste bud when you take a bite at the fried green chillies! And the best part is, you can always team up Bread pakoda with a cup of hot Chaai and subdue the heat quotient from chilies!

Recipe for Bread Pakoda ( makes about 8 pieces):

  • Brown bread - 4 pieces ( white bread can be also used)
  • Boiled and mashed potato - 3 medium sized
  • Garlic coves - 3
  • A pinch of Asafoetida
  • Black mustard seeds - 1/4 th tea spoon
  • Cumin seeds - 1/4 th tea spoon
  • Salt
  • Chick pea flour - sieved - 1 cup
  • Baking powder - a pinch
  • Vegetable oil for frying
  • Green chillies - a handful


 Process :

Stuffing and sandwich:

  •  Make some holes in the potato by poking a fork and put them into hot boiling water ( with a pinch of salt).Boil the potatoes until till tender. Once they are done, don't let them sit in water for too long, otherwise they will become soggy and this might extend the cooking time.
  • Peel and mash the potatoes and ensure there are no lumps left. Check for salt and if needed, add some salt.
  • Put vegetable oil in a pan. Once it is hot add mustard seeds, cumin seeds and asafoetida. Stir them for few seconds. ( If the oil is sufficiently hot, the mustard seeds will splutter). Add minced garlic to the oil and stir for a minute or two so that the raw smell of garlic is gone.
  • Add the mashed potatoes to the spiced oil and mix everything together. Let it cook for 5-6 mins
  • Take 2 bread pieces and make a sandwich out of the mashed potatoes. Lightly grill them in a pan ( I add a heavy weight, like a kettle filled with water on the top of sandwich so that it becomes firm)
  • Cut the sandwich in halves ( alternately cut it into 4 small pieces for smaller size pakodas)

Preparing the batter and frying:
  • Sieve chick pea flour in a bowl to ensure there are no lumps
  • Add a pinch of salt and a pinch of baking powder
  • Slowly add water and keep stirring to get a smooth consistent mixture. Don;t make it too runny mixture, otherwise the chickpea flour coating will not adhere to the pakoda.
  • Heat oil in a pan. ( To check the oil temperature, put a little drop of batter to the oil, if the drop floats back immediately, the temperature is right for frying)
  • Take a sandwich, dip it in the mixture and fry it in the oil till they are slightly brown in all sides
  • For the mirchi fries ( chilly fries) take green chillies and poke them with a toothpick.Fry them in a pan with little oil. Sprinkle salt on the chillies before you serve them.
  • Serve Pakodas with green chillies on the side and a cup of tea!

Saturday, April 8, 2017

The pink bridge

I never grew up in Kolkata, but as a child every summer we used to visit Kolkata to spend vacation at my Pishima's  house (paternal aunt). I  still remember the joy when the train used to pull over the Howrah bridge and I could feel the gentle touch of breeze as we whooshed over the river Ganga. 
River Ganga goes through the city, Howrah district is on the left and the city of Calcutta or Kolkata lies to the right. So it was double delight for us, once to arrive at the Howrah station the train would chug up on the bridge and secondly, moments later while going to the city,we used to cross the bridge again, but now this time on a bus.

I had this Khadi dress material lying with me for quite sometime.While I was planning to get this stitched in the form of a Kurta, another part of me wanted to add a personal touch to this fabric piece. And I wanted to add Howrah, the capital of my state  on this piece! Since 2002, my parents are residing in Kolkata. I miss the physical joy of crossing the bridge on train and bus, but still, sometimes I get to cross the bridge and remember those childhood joys.


As Eiffel Tower symbolizes Paris, or West Minister Abbey symbolizes London, so does the Howrah Bridge to Kolkata. The bridge has made numerous appearances in movie posters, novels and has also been in fashion circle for quite sometime. And you can realize as in poster below, Prosenjit carries off the Howrah Bridge with an elan on his T-shirt ( still from the Bengali movie Prakton) and I thought, why not me?? :)
While Howrah bridge makes a fashion statement on Coffee Mugs, T-Shirts, mementos, but to me it is also a metaphor. A metaphor of  transformation where people from different parts of India and abroad come to the city in search of employment, education , habitat.

Top: Movie poster from an old movie Howrah Bridge, Bottom left : Still from movie Prakton; Bottom right : Still from movie: Do Bigha Zamin

And since it is spring in Houston, I decided to make the bridge in pink, to celebrate the advent of Azaleas!


Here is how the final piece looks!

But yet, this is not really the final version, this will be stitched in the form of Kurta. May be after few months I will be able to post the final version of my project.
Till then , here is my city! Enjoy!